The Anti-Malware plugin

As a security expert for WordPress websites, it can sometimes take longer than expected. Finding one line of code among more than 700,000 lines of unique code that a typical WordPress website contains is quite a challenge.

But occasionally, you come across something in the middle of the night that you think, “I must share this!”

That’s exactly the case with this Anti Malware plugin that takes a lot of work off your hands:

  • Automatically removes known backdoors
  • Blocks SoakSoak and other exploits of the Revolution Slider
  • Protects wp-login against brute force attempts
  • Updates Timthumb if it has outdated versions
  • Provides the option for a quick one-click scan
  • Allows you to check all .htaccess files with one click for redirects, etc.
  • Performs checks on dozens of server directories with one click

While this plugin is not an all-in-one solution against hackers and scripts, it is a useful tool to quickly scan the website for various malware scripts, backdoors, and .htaccess files.

If you landed on this article because you are looking for solutions for a hacked website, don’t make it too difficult for yourself and let WPbeveiligen clean and secure your WordPress website. That will save you many sleepless nights.

WordPress security plugins – The introduction

Selecting a good security plugin for your WordPress website is essential, but using multiple security plugins simultaneously is not recommended. They may interfere with each other’s functionality, causing conflicts and reducing the overall security of your site. Here are some popular security plugins you can consider:

iThemes Security

ithemes wpbeveiligen

iThemes Security is a powerful and comprehensive security plugin with several strengths, including:

  • A file monitor that displays modifications, additions, and deletions of files on your server, making it easy to detect new files added by hackers.
  • An organized checklist of security issues ranked by importance that you can work through to secure your website.
  • Blocks PHP file execution from the uploads folder, an essential feature to prevent malicious code upload.
  • Collaborates with Sucuri experts to provide website scanning functionality.

However, be cautious while using iThemes Security, as some options cannot be easily reversed on an existing WordPress website. Over-securing your website can lead to unintended consequences.

WordFence Security

WordFence is widely known and includes a scanner that compares your files with the core files of WordPress. The free version may not scan all files, as premium plugins are not included in its database. WordFence also offers a Falcon engine, which claims to speed up your WordPress site significantly, but its effects may vary.

Securi Security

Securi is a reputable company that offers a powerful plugin with features like plugin removal and reinstallation, which can be useful for cleaning up hacks. Keep in mind that updating plugins might not remove all hack files, which is why removal and reinstallation are essential in some cases.

Bulletproof Security

bulletproof wpbeveiligen

Bulletproof Security is a more technical and less user-friendly plugin. While it has some unique features, other plugins mentioned earlier offer similar functionalities, such as caching, login security, and Htaccess management.

Ultimately, the choice of the security plugin depends on your specific needs and preferences. Whichever plugin you choose, ensure you configure it properly. No plugin can guarantee 100% security, and it also depends on how well you use your website as an administrator. Avoid clicking on suspicious links in comments, as they may execute malicious codes and potentially lead to a MySQL injection if you are logged in as an administrator.

Remember, as a website administrator, you have more control than a security plugin can provide. Your decisions and actions play a crucial role in keeping your website secure.


SecuPress security for WordPress

SecuPress is a security plugin for WordPress.
With its 30,000+ active installations, SecuPress may not be the most well-known security plugin, especially compared to iThemes Security with 1+ million installations and WordFence with over 4+ million active users.

However, we still want to highlight SecuPress because it appears to be a very good security plugin with unique features that are currently lacking in the previously mentioned popular plugins.

What cool features does SecuPress offer?!

  1. In the “Anti Spam” tab, you can choose to completely disable comments, including their display in the admin menu. This eliminates the hassle of dealing with unnecessary comment features and comment spam.
  2. In the “WordPress core” tab, you can enable automatic updates for minor and/or major WordPress updates. This is typically configured in the wp-config file, but SecuPress makes it much easier.
  3. In the “Plugins and Themes” tab, you can check a box to prevent the activation of new themes or plugins. This is useful when someone with administrator access wants to install any insecure plugin they can find 😉 Additionally, you can disable the upload of zip files (themes and plugins), which helps prevent the upload of nulled themes or plugins.

Most of the other features offered by SecuPress are quite similar to iThemes Security and WordFence. Virtually all the important functions provided by the other two plugins can be found in SecuPress.

Cost of the PRO version is cheaper than iThemes and WordFence

The free version of SecuPress is very comprehensive, and the pro version (€60 per year) is slightly more cost-effective compared to iThemes Security (€67.44 per year) and WordFence (€83.45 per year).

What is Wordfence?

Wordfence is a plugin that protects WordPress websites against malware and hackers.

Wordfence works proactively by using a firewall and includes a file scanner to check your WordPress site for hacks, backdoors, and viruses.

What does Wordfence do?

  1. Wordfence uses a firewall to block attacks on your website
  2. Wordfence has a built-in scanner to scan your WordPress website for hacks, backdoors, and common viruses
  3. Wordfence provides options to enhance the security of your login screen
  4. Wordfence offers features to disable WordPress functions commonly exploited by hackers
  5. Wordfence sends you notifications when issues arise
  6. And more…

Wordfence is the most widely used plugin for WordPress

With over 4 million users, Wordfence is the most popular security plugin. Following Wordfence, iThemes Security has 1 million active installations, and there are a few other smaller options like Bulletproof, Sucuri, Cerber.

Are you already using a security plugin for WordPress?

It is recommended not to wait too long to install a security plugin. Both new and old sites are targeted by hackers. Whether your website is small or large, make sure hackers can’t gain control over it!

Who created Wordfence?

The strength of Wordfence lies in the team behind it, which is Defiant.

teeam defiant

Defiant is the company behind Wordfence, and the team currently consists of 35 developers, each with 5-20 years of experience in websites, programming, and communications.

Team Defiant has various analysts (such as Ram Gall, Giles Wright, Marco Wotschka, Gregory Bloom, Matt Sinagra, Charles Sweethill) who monitor and analyze online threats.

They also have specialists who are skilled at removing malware from websites. While much of the work is automated with the help of customized software, due to hackers constantly coming up with new tricks, manual work and checks are still necessary.


Install Wordfence in WordPress

You can install Wordfence in three different ways:

  1. Via the plugin installer in your admin area: This method allows you to retrieve Wordfence from the reliable WordPress.org plugin database. In your admin area, go to “Plugins” and then “Add New.” Type “Wordfence” in the search field. Make sure you do NOT install the assistant version but the plugin called “Wordfence – Firewall & Malware scan.” Click on “Install Now,” and once the plugin is installed, click on “Activate.”
    wordfence installeren
  2. If the installation method described in the previous step doesn’t work, you can manually download Wordfence from WordPress.org and upload it in your admin area.
    wordfenceGo to “Plugins” in your admin area, then click on “Add New.” From there, select the “Upload” option and choose the downloaded zip file from your computer/mac. Click on “Upload/Install” and then “Activate.”
  3. If both methods mentioned above don’t work, you can manually upload the plugin to the server. For this, you’ll need server access and an FTP program. You can use a program like Filezilla. Upload the Wordfence plugin (unzipped using WinRAR or WinZip) to the wp-content/plugins directory. Once uploaded, go to the “Plugins” section in your admin area and click on “Activate” for the Wordfence plugin.
Always make sure to install Wordfence from WordPress.org and NOT from any other source. Do NOT search for Wordfence on Google to download it, as paid advertisements with malicious programs may appear at the top of the search results!

Is Wordfence enough to secure your Web site?

Many people install Wordfence and then happily continue developing their websites. Voila! Security is taken care of, right?!

However, I still have a few tips if you want to properly secure your website. Here are some important steps to take:

  1. Review Wordfence settings: When you first install Wordfence, not all settings are configured optimally. This is because different servers or websites may not work well with certain restrictions. You need to manually review the settings to secure your website as effectively as possible.
  2. Use one security plugin, not three at once!: It’s important to use one reliable security plugin. Using multiple security plugins can lead to conflicts. They essentially perform similar functions, such as logging and blocking IPs and attacks. Multiple security plugins will interfere with each other.
  3. Ensure you have a complete data backup: Do you rely on your web host to handle backups? Well, not all web hosts provide complete backups (data + database), and some may only perform them weekly. There may also be storage limitations. Make sure you have the ability to choose backups from at least the past 3 days and have backups available for at least 2-3 weeks. At minimum! If your host doesn’t offer this, you can use a plugin like UpdraftPlus to configure backups. For example, set it to create backups once a day or every two days, with a retention policy of 10 backups and a minimum of 4 weeks. (Keep in mind that you’ll need sufficient server disk space or consider storing backups externally.)
  4. Update in a timely manner: No matter how good the security is, keep your theme, plugins, and WordPress itself up to date. Certain vulnerabilities can provide hackers with ample opportunities that security measures cannot counteract, risking the functioning of your website.
  5. Host one WordPress installation on a hosting package: It’s common for a test installation or an old blog to remain active. Hack scripts test your domain name for old installations to gain access to the server. Examples of folder names they search for include “old,” “new,” “blog,” “wp,” and “wordpress.” Additionally, WordPress sites can easily show up in search engines like Google, including old sites and test installations. So, don’t leave them unattended!
  6. Ensure you have a reliable web host: Some web hosts lag behind in maintenance or use outdated PHP versions. Hackers frequently discover vulnerabilities that require regular updates to server software. Make sure your host applies updates in a timely manner.
  7. Use a strong password: It goes without saying, use a strong password. But how often do people use passwords that are in the dictionary, like “fridge7” or the name of a pet? Even worse, some people use the same password to log in to multiple websites. Don’t do that! If a website, not even yours, gets compromised, those usernames and passwords will be exposed. Scripts will pick them up and attempt to use them on any website they can associate with the username. Use a long and unique password or consider using a password manager like LastPass or Dashlane.

A chain is only as strong as its weakest link, so make sure there are no weak links in the security of your website!

Tutorial – Secure your WordPress website properly with the free iThemes Security plugin

You want to secure your WordPress website against hackers and malware, right? That can be done in many ways, but we assume you don’t want to incur any costs.

We will now show you step by step how to install the free version of iThemes Security and, more importantly:

how to optimize the settings of iThemes Security for WordPress

Let’s start with the installation. We assume that you haven’t activated any antivirus plugins on your website. If you have, it is recommended to remove the old one since having two security plugins can adversely affect the speed and functionality of your website.

Do you have WordFence? Cerber? Ninja Security? Well, then you’ll have to choose 😉
If it’s iThemes Security, then read on!

Backup

Before you get started, make a backup of your website.
You can use the free plugin UpdraftPlus to create a backup.

Installing iThemes Security

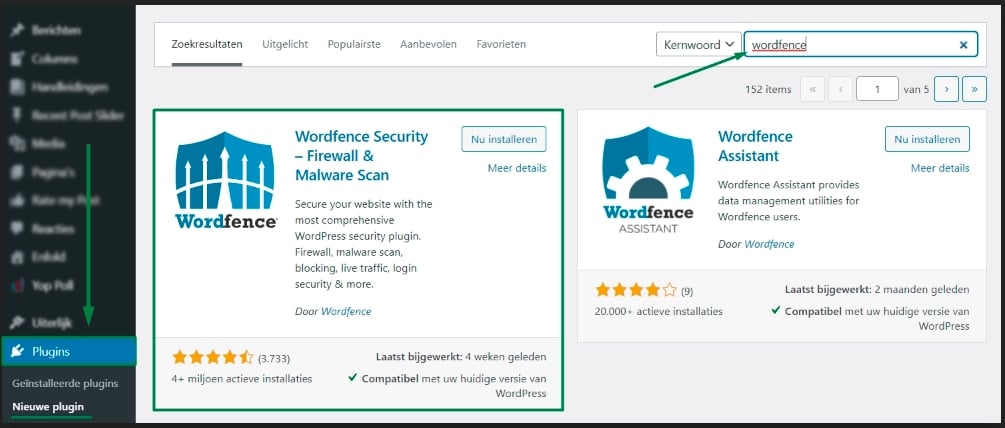
Go to your admin panel and navigate to “Plugins” -> “Add New”.
Type “ithemes” in the search field, and iThemes Security will appear.
Click on “Install Now”.
After that, click on “Activate”.

That wasn’t so difficult, was it?
But now the configuration begins.

Security Check

When you first install iThemes Security, you will see a screen with some default options.

beveiligingscontrole

You can click on the blue button to enable some default features. You will come across them later in this guide.

Many people think that everything is immediately set up correctly

But if you want to make the most out of your website security, there are several options that you can enable. In the next step, we will help you configure various important functions that are not yet enabled.

Configuring iThemes Security

Go to the “Security” -> “Settings” tab in your admin panel if you haven’t seen those options yet.

You will see several blocks there, with the light blue ones being active and the white/gray ones not yet.

blokken ithemes security

Note: we won’t enable all the features. For example, the “Away Mode” allows you to make your admin inaccessible during the night… a nice feature, but just don’t do it 😉

Let’s start configuring!

First, go to the block: Global Settings

Scroll down until you see the bold sentence “Days to retain the database of logs“.
Change it from 60 days to 25 days.
globale instellingen dagen

Why: within 60 days, sometimes so many notifications are generated that your database becomes too burdened. While your database might be

10 MB in size with only a few posts, the logs can quickly accumulate to 125+ MB of data. This is not good for the speed of your database and, consequently, your website.

Now you’re done with that, and you can move on to the next block: Notification Center

By default, it is checked to send notifications to all administrators. This is not ideal. We assume that you manage the website, and in that case, it’s even risky to send all notifications to every administrator. Uncheck “All administrators” and check your own name instead.

notificatie beheerder veranderen

It is recommended to uncheck the “Daily Security Update” and “Site Lockouts” options. We assume that you regularly monitor your website and/or check the logs. We will cover this in more detail later.

notificaties uitvinken

Why turn off notifications? Well, otherwise, you’ll receive an email every day for any activity on your website. For example, blocking attempted intrusions by bots. You may even receive multiple emails per day because bot intrusion attempts are quite common. While the security plugin blocks them, you don’t want to get nervous every time the plugin does its job.

Don’t forget to save the settings with the blue button at the bottom before moving to the next block.

404 Detection

Enable this feature. The 404 Detection keeps track of how many times a specific computer searches for non-existent pages. Bots, viruses, and malware generate a large number of requests in a short period as they search for vulnerabilities in plugins, themes, and your WordPress release.

If you have many files/images in your website that are not correctly linked, they can also generate 404 errors, potentially triggering false positives for legitimate visitors. Therefore, change the “Threshold” from 20 errors to 50 errors. This means someone would have to make a significant effort to trigger the 404 monitor.

drempelwaarde 404 monitoring

Ps: The registration of 404 errors is not only passive but also active. If too many 404 errors come from an IP address, it will be temporarily blocked. If that computer/person/bot continues to visit incorrect pages, it may eventually receive a longer or even permanent ban, which means they won’t be able to access your website or cause any trouble.

And that’s what you’re aiming for – you don’t want hackbots to abuse the server’s capacity.

Database Backups

Decide whether you want to have a backup in your mailbox or set the “backup method” to store backups only locally. As mentioned before, iThemes Security is here to do its job but not to overwhelm you with email notifications and data.

backup methode

Storing backups locally means that the database backup will be saved on the server. Change the “number of backups to keep” to 3 to 10, for example.

Ps: Check the “Schedule database backups” option at the bottom to enable automatic backups.

WordPress Contants

This information is more relevant to experienced programmers, and they wouldn’t rely on the site diagnosis tool for this information 😉

However, if you really want to, you can check here whether the “debug mode” is on or off, if “debug logging” is enabled, and if the paths to wp-content and plugins are correct.

File System Permissions

Those terms… which translator came up with them.
Anyway, here you can see if the most important directories, such as the root directory, wp-content directory, plugins directory, and some others, are writable.

Conclusion and Closing

If you have used the site diagnosis tool of iThemes Security before, let us know in the comments and whether it was helpful.

Honestly, this information is mainly for advanced programmers, and they would look directly at the places where the settings are located instead of using this diagnostic tool.

Security

The first thing a hacker does is gather technical information about a website. So, do you really want a code on your website that displays all the technical information? Not really!

Hiding the login page – iThemes Security

By default, the WordPress login page is found on the “admin” page. That’s with every standard WordPress website worldwide. Every hacker and hackbot knows that … they can easily make attempts to log in through your login page that way.

It’s important to hide the default login page

Why you should hide the login page:

  1. Even if you have a great password that makes logging in “impossible” you will suffer if attempts are made to log in through that well-known login page. This is because mainly scripts use that page to fire thousands of attempts at it. They call it brute force attacks.
    Brute force attacks make your website slower! These are requests that are processed by your website, and behind it by the server, at the expense of loading speed for real visitors.
  2. Not everyone needs to know that your website is made with WordPress right?
    (I know, in the source code you can see it too but not everyone looks there)
  3. It says something about your website, for example I quickly know if a website is well secured or not when I visit the default login page. And hackers know that too.
    And if I find admin as a username there too… sigh! – But that’s something for another article ;)So the key is to make the login page inaccessible to the world!

[press-server]There are websites where the login page gets 5,000 “visitors” every day, spread over 24 hours… the IP addresses change constantly so the server will not block all the attacks. Even if it comes at the cost of server capacity. Hiding the login page is an important step against unwanted “visitors” (bots & scripts)[close-press-server].

iThemes Security has the ability to hide your login page

Ironically, that feature is also kind of hidden! In fact, you won’t encounter it during the default installation.
You can find this setting at Advanced > Hide backend.

There you can move the login page to a page with a unique name.

admin verbergen ithemes security

Remember that new page name well! That way you can always login to your website.

Also keep in mind that the regular login page is inaccessible from now on (until you are logged in), if you keep looking for it anyway the security plug-in may temporarily block your account.
Therefore, please also give the new admin address to administrators who regularly login to your website.