Removing a WordPress virus yourself in 5 steps
Every day, hundreds of WordPress websites get infected with viruses. These viruses can include files or pieces of code that send SPAM or display unwanted ads to your visitors.
For a business website, I recommend having your WordPress restored and secured so that you can be sure your WordPress is virus-free and have the assurance of a guarantee to fall back on if the infection turns out to be more complicated and persistent than expected (which is often the case!).
However, for a hacked WordPress blog or hobby website, you may not want to spend too much money, and you can attempt to remove the virus yourself and revisit it later if you’ve missed anything.
We will guide you through the process of making your WordPress virus-free as effectively as possible!
There will be many links behind terms you might not be familiar with; visit those pages and educate yourself to ensure you remove the virus correctly.
First, make a backup of all files and the database!!
Step 1 – Removing the WordPress Virus
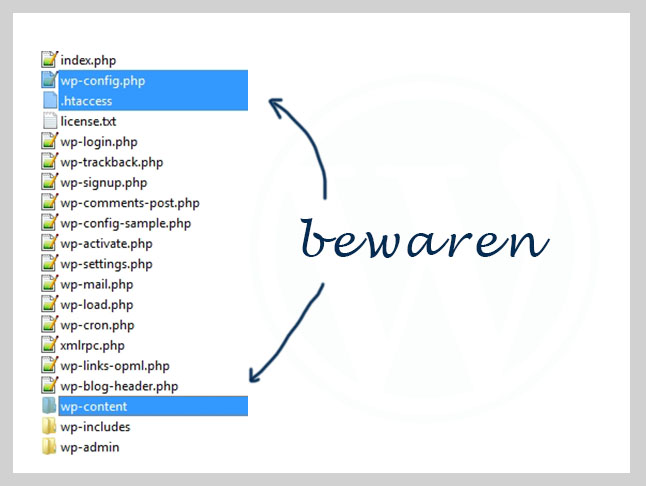
The virus may consist of just a few files or as many as 100 to 5000 files! For example, a virus may create pages on your server. To avoid having to check each WordPress file one by one, you can start by removing the standard WordPress files in the “root” of your website.
Keep the wp-content folder, the htaccess, and the wp-config. These contain unique files you don’t want to overwrite with a new WordPress installation.
Download the latest version of WordPress.
Step 2 – Checking Files for Backdoors
A WordPress virus doesn’t just consist of files; there are often pieces of code (syntax) added to your theme or plugins, known as backdoors.
To find them, check the file modification dates. If all the files in your theme or plugin were placed on 3-05-2015, but one file has been edited or added on a different date, there’s a good chance it contains code that shouldn’t be there.
Inspect this file; you’ll likely find Base64 or eval code that is unreadable and differs from regular PHP formatting. Carefully remove these lines of code.
Some tricks to watch out for:
- Virus code is often written in Base64, but it can also be a single line of PHP that passes data or gives a write command.
- Virus code is often placed at the beginning or end of a file; automation takes care of this logic.
- Sometimes they leave a lot of white space at first, making the file appear empty, but the code is located to the right, requiring you to scroll to see it.
Step 3 – Adjust File Permissions
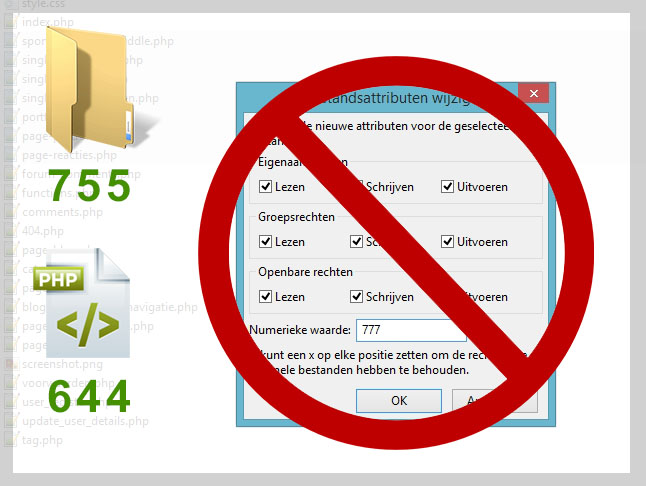
You don’t want files to be modified again within a day if a virus file is still present. You can set many directories so that they cannot be edited by WordPress or a virus that doesn’t have Username and Password access via FTP software. (The downside is that updates will need to be done manually.)
For example, you can set theme files to 644 and directories to 555 (the crucial thing is to avoid setting them to 777!).
Step 4 – Install a Security Plugin
Preventing a WordPress virus depends on many factors, but one important aspect is preventive security.
Install and configure a security plugin to prevent a virus file from easily returning through a vulnerability and to immediately detect file changes.
For choosing a security plugin, you can read this article.
Step 5 – Create a Backup
Make another backup? But I’m done now, right? I’ve removed the virus from the website.
Well, if you’ve overlooked a file, the virus may reinstall itself on the server and in the files. This could happen through an automated file that writes files to your server daily or weekly.
In case this happens, you can restore the backup from the time when your website was seemingly 97% clean, and you can fix the last percentages.


